Showing posts with label Classical Greek. Show all posts

Thursday, 20 August 2020

AAR; Greek versus Persian (Sword & Spear) 18Aug2020

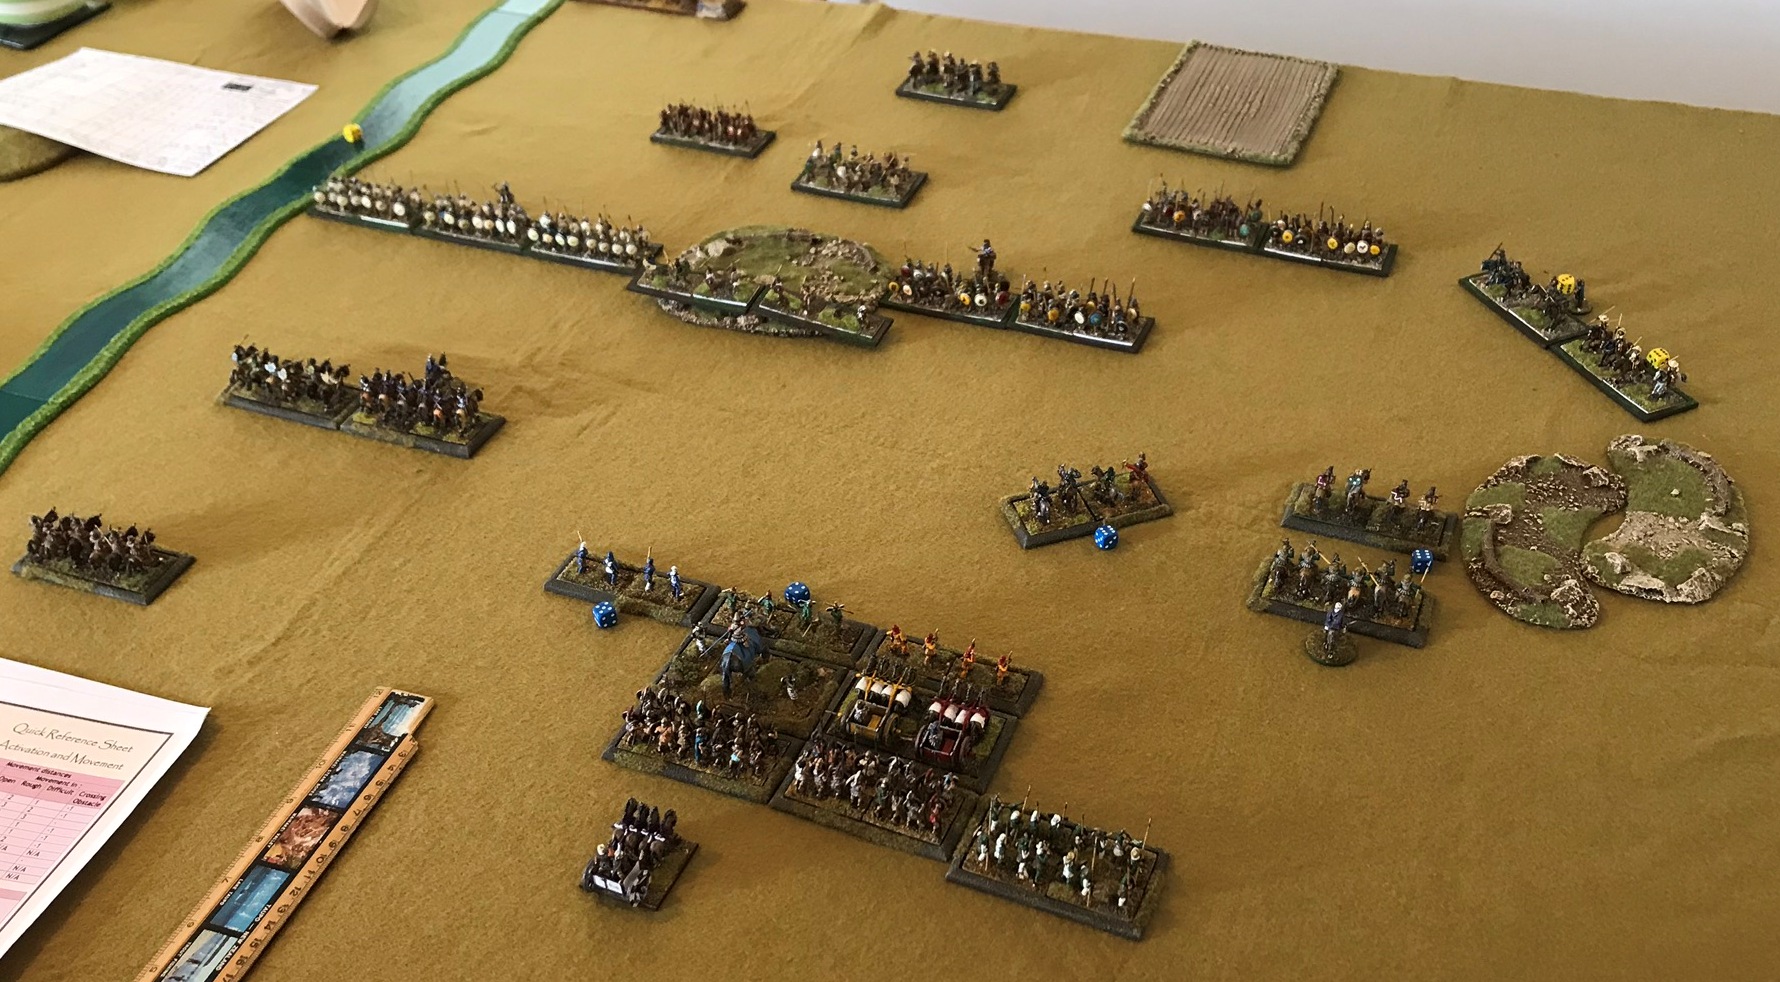
I have not played an opposed wargame since lockdown in late March this year. Restrictions are slowly lifting, so Ian kindly invited me around to his house to play a game of Sword and Spear (S&S). We used his figures and army lists. I choose to be Later Greeks with lots of hoplites, generally poor quality, and a reasonable numbers of cavalry and light troops. Ian played the Persians who had more cavalry and, crucially, a strike force comprising scythed chariots and an elephant.

When playing hoplites I am naturally concerned about my flanks, particularly when my hoplites are poor, meaning forward movement is OK but any fancy manoeuvres are nigh on impossible! I was therefore surprised when Ian deployed a river which narrowed the battlefield and gave me one secure flank to deploy against. I was able to deploy a strong hoplite line with my cavalry protecting my potentially exposed flank.


The battle opened with the light troops and flanking cavalry. I have never found shooting to be very effective using S&S, but Ian’s dice rolling showed me the error of my ways! Although I had lost most of my light troops, I had blunted Ian’s flank move and the hoplite line remained firm. Next, Ian’s shock troops piled in and I must admit to some trepidation at this point. The ‘Dice Gods’ turned against Ian, and the Persian scythed chariots bounced and the elephants failed to squash my peltasts. I think both Ian and I thought the game was up for the Persians, but never trust the dice! My peltasts eventually died but I was not concerned because my sole elite hoplite unit was covering the situation as planned. Unfortunately the demise of the peltasts did place a shock on the end unit of poor quality hoplites who were promptly charged by Ian’s elite cavalry (no worries). The combat result was bad and I had 3 discipline tests to take (again, no worries), and I roll three ‘1’s! Result a dead hoplite unit, a dead general and suddenly my front was opened up. My army just fell apart and defeat rapidly ensued.


An enjoyable game that swung one way then another. I think my mistake was to sacrifice my skirmish troops too early and with no specific objective in mind. This leaves you with a deficit which means it only takes a few lost units of formed troops before you are staring defeat in the face. Anyway, it was great to roll some dice again and I must thank Ian for arranging the game and taking the photos. More photos were taken but I'm having great troubles Blogger at the moment and adding photos is proving impossible. I look forward to hosting a return fixture.

Monday, 11 March 2019

AAR: Successor v Greek (S&S); 10Mar19


It was Ian’s turn to arrange a game and provide the troops. We used his Early Macedonian Successors versus Later Greek Hoplites, in a game of Sword & Spear. I played the Greeks whilst Ian took the smaller, more professional Macedonians. I was slightly worried because I hate fighting pikes and/or elephants; I never know how to tackle these troop types.

The battlefield was fairly open and Ian narrowed the frontage by placing a river on my left flank. I was out-scouted so had to deploy first, and I opted for a fairly conventional approach; hoplite centre with light troops out front, and cavalry and peltasts on the flanks. Ian had a pike juggernaut with elephants in the centre and a strong cavalry flank force facing my right.

The game proved to be a very close fought, tight affair. My hoplite centre remained stationary to avoid early contact with Ian’s pikes. My skirmishers won the conflict with their opposing skirmishers. On my right flank, my peltasts gained the high ground and held off Ian’s cavalry and a unit of my light cavalry actually managed to attack the Macedonian Companions in the rear (they died in the attempt!). The Companions then tried to smash my peltasts and, due to some poor dice rolling, the cream of the Macedonians were eliminated. On the opposite left flank, my undrilled hoplites did manage to advance, turn and threaten the enemy pikes, but were held off by some more Macedonian cavalry. The fact these cavalry were tied down, allowed another unit of Greek light cavalry to move around the left flank and attack the Macedonian camp.
Early dispositions with Greeks at the bottom of picture


Meanwhile in the centre the Macedonian leviathan trudged on. The elephants squashed some Greek skirmishers and pursued into my Greek heavy cavalry, who also died. Then the pike blocks hit home. One unit of hoplites died, but the others just about held on. My single unit of Spartan hoplites plugged the gap and took out Ian’s elephants (hooray!). On the left, I did manage to engage one pike block in the flank with some hoplites, but they could not push home their advantage.
The pikes move forward, elephants about to crush my cavalry, my hoplites
start to swing around on the left flank.


Both armies were now within a single point of breaking, but time was pressing on and I had commitments in the evening, so I offered Ian an honourable draw, which he accepted. I think this was a fair result, but on the drive home I wondered if I had done the right thing? If another turn had been played, I could not envisage Ian destroying another of my units, whereas I still could destroy his camp with my light cavalry (only 1 more hit required). But, if I had failed then further play would have seen my forces in trouble against Ian’s pikes; so maybe I did make the right decision.

This was one of most enjoyable games of Sword and Spear we have played. It was close, competitive and required careful thought by both players. Neither side was too plagued by bad dice, so the luck element was not a major factor.

Monday, 12 November 2018

AAR: Lysimachid v Thracian (To The Strongest) 11Nov18


This game was of Ian’s devising, using his figures, army lists, game cloth and markers etc. I must admit to being rather lazy and did not research ‘To The Strongest’ (TTS) rules or lists before the game, and my knowledge was therefore based on games of FK&P played a couple of months ago. We randomly diced for which army we would use, and I got the Thracians whilst Ian commanded the Lysimachids. The Thracians would clearly benefit from cluttered, difficult terrain and needed to shoot as much as possible during the opening moves to try a disorder/disrupt the heavier Lysimachid pikes and cavalry. I duly placed as much difficult terrain as allowed whilst Ian placed open areas. Then each terrain feature is assigned a card and the effects worked out. I like this randomising aspect, but it does radically alter the battlefield and makes pre-planning very uncertain. In this game virtually all my difficult terrain was removed and we were left with an open plain with a few gentle hills and a bit of woods on my far left flank. I therefore had a ‘bad’ feeling even before the game started!
Thracians at the bottom of picture.


After we deployed, Ian activated his ‘stratagem’ which allowed his own Thracian (traitor) forces to move forwards and take control of that lone wood I might have benefited from! A ‘sinking’ feeling became apparent in the mind of the Thracian commander. I did have a numerically strong light cavalry force on my right flank which I moved forward to engage the smaller Lysimachid cavalry and threaten the flanks of the pike blocks. I launched a hail of missiles for next few turns but to little avail. I even managed to charge the enemy horse in the rear, and bounced! I soon began to realise the weakness of light horse when charged by any heavier cavalry; they have to attempt to evade (so ground is rapidly lost) and if they fail to evade they get hit (and therefore killed) without any opportunity to hit back! I did have a few successes on this flank; I disrupted his pike blocks by shooting, and killed a few of Ian’s skirmishers and light cavalry, and wounded both of his commanders.
Thracian light cavalry facing the Lysimachid heavies!


On my left flank, my Thracian foot engaged Ian’s Thracians. I thought I would have the upper-hand because half my units were veteran and had heavy cutting weapons, but no, Ian’s forces prevailed in fairly slow grind. I also played my ‘stratagem’ to hit his commander, but only achieved a light wound. I must admit that I was not focussed on the game as much as I should have been, and simply allowed Ian to work out the values of the chits I needed to draw etc.  The reason for this lack of engagement was due to the fact I had done a ‘mischief’ to my back a couple of days earlier, and although I could walk etc., I was finding concentration hard to maintain (a lame excuse, I know!).
Thracian left flank about to go in


In the centre Ian’s disrupted pikes seemed inspired, making difficult retirement moves followed by rally actions. I had little available to stop the pike juggernaut rolling forwards, and in the end I conceded the game. Ian’s winning streak continues. In this game I felt defeat staring me in the face from the very start, but I still enjoyed playing and look forward to future games using TTS. I certainly intend buying my own copy when I attend the Warfare show next weekend.

To conclude; I really like ‘To The Strongest’ rules, they give an interesting, fast-paced game that is perfect for a club session. The activation mechanic forces a nice degree of decision making and prioritisation. Melee seems much more decisive when compared to the ECW version of the rules. I think using chits rather than playing cards is the best way to play. Overall I think I still prefer both ‘Impetus’ and ‘Sword & Spear’ rules, but ‘To The Strongest’ is a good alternative.

Friday, 18 August 2017

AAR; Greek Hoplites (Basic Impetus 2)


This is a brief report on a couple of games with Ian’s 15mm Greek Hoplites using the new version of Basic Impetus (Dadi e Piombo, 2017). Ian has just returned to the UK following a sabbatical in Kenya. Unfortunately he contracted Malaria out there. He is now on the mend, but not yet fit enough to get about, so I visited him at home. Although we are both familiar with the standard Impetus rules, this would be the first attempt with Basic Impetus 2. I forgot my camera, so the photo simply shows my own Greek Hoplite forces.


The first game pitted me, using Athenians, against Ian’s Thracians. Surprisingly my sole cavalry unit got the jump on the Thracian cavalry, destroying both Thracian light cavalry units, before succumbing to a counter-attack by Thracian Nobles. Still, the flanking move by the mobile Thracians had been blunted. Meanwhile my hoplite line trudged across the whole width of the table to strike the Thracian peltasts. When I made contact everything seemed to go well, and both of us thought an Athenian victory was in the bag. Big mistake! The Thracian Noble cavalry finally made it back from the flank and hit my hoplites from the rear. Athenians were falling in numbers and the losses passed 50%, so a narrow Thracian win resulted. If I had Just one more turn before this disaster then I believe the Athenians would have emerged on top.
Note the Pittsburgh Steeler fan in the centre of the photo!


For the next game Sparta (me) was matched against Thessaly (Ian). I thought I had a strong position with both flanks of my hoplite line anchored on woods. I did send some hoplites on a flank move (mistake, too slow), but Ian decided to match up against my hoplites whilst moving his cavalry through the flanking woods (!). I did manage to hold up the cavalry but I must have really upset the ‘Dice Gods’ because the Spartan hoplites went down to the mixed bag of Thessalian hoplites and peltasts. I don’t think my forces could have been ‘real’ Spartans, they were just imposters!


So, two defeats but it was an enjoyable afternoon of wargaming. It is great to see Ian back and I hope these victories will help him to get better more quickly. Regarding the rules; the mechanics will be familiar to any who have used the Impetus rules family. We really like the new elements e.g. the charge/pursuit move bonus, the variable retreat move, and the reduced shooting effectiveness. All worked well. I hope these additions are included in the next version of Impetus, which I believe is due to be released at the end of the year.

Monday, 19 September 2016

AAR; Wargame Weekend 17/18 Sept 2016


My friend, Graham, who I’ve known and gamed against for over 50 years, and currently lives in Brussels, visited for the weekend. He is an excellent wargamer (i.e. mainly wins) and frequently plays competitively. He used to play ancients (DBM, then FoG) but has dropped the period and now plays predominately WW2 FoW. I therefore decided to show him the ‘Sword and Spear’ rules (S&S) to maybe rekindle his interest and get his 15mm armies out of their boxes. Unfortunately I forgot to use my camera, so there are no photos with this post.

Our first game involved Medieval Hungarian (me) versus Ottoman Turk (Graham). My first mistake was not to allocate enough dice to scouting, so ended up deploying first. The terrain was fairly open, but there was a big forest on Graham’s side of the table opposite my left flank, which I thought would restrict both his deployment and movement of cavalry on this flank. I therefore made my right flank strong (most of my knights), with only a couple of mounted units covering my left flank. Graham promptly deployed heavily against my weak left flank, accepting the forest impediment! Could my outnumbered left flank cavalry hold long enough to allow my right flank troops to move across the army front and intervene? My left-hand cavalry did OK but were eventually overwhelmed, and the Turk cavalry went on to pick off various Hungarian foot and threaten my camp. My potentially decisive right-hand knights did move across but were hindered by being ‘undrilled’ and slow (heavily armoured). Just as they began to close with the Turks, I was reminded by another trait Graham often employs i.e. he will avoid any clash where he has a disadvantage. Rather than face my knights, his heavy cavalry simply retired and surrendered ground, leaving me punching air, desperately trying to pin down his illusive cavalry, and pointlessly moving around the back of the forest. The final result was a decisive win for Graham and the Turks!

Next we had a game using my Greek hoplites for the Peloponnese War, with Graham taking the Athenian/Thessalian army versus my Spartan Alliance force. Terrain placement went well for me until Graham fortuitously placed a marsh in right front of my nicely placed gentle hill on which I planned to centre my army. In this game I was determined not to be outscouted and devoted a lot of dice to ensure this (and still only just beat Graham by one point!). Luckily in the first turns I threw good dice and was able to move my hoplite line forward quickly. I was concerned that my lack of cavalry compared to Graham’s Thessalians would result in me defending threatened flanks against envelopment, but the rapid movement of my hoplites largely removed this option. The clash of the hoplite lines was fairly balanced; my superior Spartans fighting against Athenian hoplites defending another gentle hill. For many rule systems a clash of hoplites can be a very boring situation with little thought as the conflict unfolds, but the dice allocation mechanism of S&S forces players to constantly think, assess the situation and carefully consider where to place available dice. The game remained close and Graham eventually broke the Spartan army, but I was within 2 points (i.e. a single unit of the Athenians, even Psiloi) of victory. We immediately ended the game at this point (lunch was ready) but with hindsight we should have concluded the turn because there was a chance that the end of turn army morale test could have resulted in the loss of one more unit from the Athenians, therefore converting the marginal win in to a draw.

I think Graham enjoyed both the games and the S&S rules. He thought the S&S rules worked well and cleanly, giving a fast, clear result and forcing the player to constantly think about actions/reactions. He did find the mechanism rather abstract i.e. is the game simply a dice allocation game rather than a tactical military simulation? I can see his point, but would counter that this happens with most rule sets (e.g. DBM PIP allocation), and the ‘cheesy’ moves that seem to happen using FoG that are far from ‘historical’. I hope that the two games we played may inspire Graham to buy a copy of the rules and get his 15mm armies on the table again, at least for ‘friendly’ games.

The next day we played a couple of SAGA games. In the first game Graham’s Anglo-Danish force rapidly beat my Vikings. I learnt not to allow your Warlord to become isolated, because he will quickly become dead meat! For the next game I changed my army to Normans. I intended to shoot Graham’s forces, but he quickly scuttled out of line of sight. He then skilfully used his dice to take out my crossbows and damage my peasants. My knights, lead by my warlord, charged a unit of hirdmen, which Graham bolstered with his warlord. The result was the death of both warlords and a drawn game.
Again, this was Graham’s first use of SAGA, but equally I’ve only played one or two games over two years ago, so we were both inexperienced! The games were fast and furious, and we both felt the skill revolved around usage of the special abilities of armies. I think game play would improve with more experience and improved familiarity with the force being used. I therefore resolve to get in more opposed games using SAGA. I don’t think SAGA would work solo because you need the uncertainty provided by an opponent when allocating dice.

Monday, 13 June 2016

AAR; Early Macedonians v Greek Hoplite (Sword & Spear rules) 12 June 2016


This was the first competitive game I have played for a couple or months or so. Ian kindly provided both of the armies, both nicely painted, and this would be our first use of pike armed phalanx units. We randomly selected our forces and Ian got the Macedonians. The terrain choice was unusual, the number of pieces was low and they all ended up on my right flank. Effectively we would be playing on a flat, open plain bordered on the extreme right with multiple areas of rough ground.

I could immediately see a dilemma for my Greeks, how to counter the 3 unit wide Macedonian phalanx of large units? I knew my hoplites, even the 2 units of tough Spartans, would not hold such a force. The obvious tactic would to be to worry the flanks of the phalanx, but I had less cavalry and the Macedonian cavalry were better quality. I had a small advantage in Psiloi but this clearly would not have the desired impact. My sole advantage lay in having more heavy hoplite infantry but this was poor quality (discipline 4 and undrilled, or discipline 5), which would lack the manoeuvrability and speed required. Only my Spartans had discipline of 3 that could undertake such action. I therefore deployed my main hoplite line at an angle to make contact problematical for the Macedonians, and I deployed my Spartans at either end of the line. I planned to use the more manoeuvrable Spartans to move and pressure the phalanx as it advanced. I deployed my cavalry on the extreme left, not in any anticipation of victory, but rather to draw the larger Macedon cavalry force away from my battleline.


The opening moves were favourable for me. My psiloi dispatched their opponents and surprisingly my light cavalry destroyed a couple of units of better quality Macedonian light cavalry. Unfortunately the victorious Greek light cavalry pursued, moving them out of support distance from the other Greek heavy cavalry. I was leading the victory points race at this stage! The superior Macedonian heavy cavalry now rapidly destroyed their Greek counterparts. I moved both my flank Spartan hoplites forward to attack the supporting enemy units protecting the Macedon phalanx. Unfortunately the right-hand Spartans lost their supporting peltasts and now faced 2 units of Thracian heavy infantry by themselves. On the other flank my victorious light cavalry had a choice; either take the enemy camp (for 3 victory points), or move around the enemy army and attack the Thracians is the rear as they faced my Spartan hoplites to their front. I choose the latter option, and it almost worked, the Spartans only needed to hold for one more turn. Instead my right-hand Spartans collapsed. My advancing left-hand Spartans were also only a turn away from potential success but were just intercepted by the returning Macedonian cavalry. They went down in a Companion/peltast sandwich, and this also cost me my sole Captain. I was now in dire straits. I did throw a good group of order dice (including 3x 6’s) so I threw my poor Theban hoplites against the slightly disrupted Macedon phalanx. I did inflict a few hits but the pikes won, routing my hoplites and killing my C-in-C. A clear victory for Ian’s Macedonians.

I’m still not sure what I could have done to avert defeat. More favourable terrain may have helped. I think I definitely needed another Captain to help rally off hits. My numerical advantage in heavy infantry did not help me at all, due to their poor speed and manoeuvrability. It was a pity that my light cavalry pursued out of support distance from the other Greek cavalry. I think my decision to move them around the Macedonians to attack the Thracians was good and almost worked. I think the Greeks had no counter to the clear Macedonian strengths (phalanx and cavalry). Overall, a good, enjoyable game. It was great to play an opponent again!

Monday, 7 September 2015

AAR; Syracuse vs Athens (Sword and Spear) 6 Sept 2015


August has been a very poor month for wargaming. I just have not had the time or opportunity to play. Therefore this outing was my first game for over 6 weeks. Both armies were supplied by Ian and comprised 500 points using beautifully painted 15mm figures which my camera does not do justice. The rules used were Sword and Spear (Mark Lewis; Polkovnik Productions, 2014). I commanded the Athenians, whilst Ian commanded the forces of Syracuse. The 6’x4’ table was again fairly open, I placed a river to protect my right flank.
The Athenian army was composed primarily of poor quality hopIites (discipline 4 and undrilled), with some cavalry and psiloi including a couple of units of Cretan archers. The Syracuse army was more varied; a few less units of poor hoplites, some Gallic and Iberian mercenary foot, decent quality cavalry and an artillery unit. I realised that Ian would concentrate his efforts on my open flank using his better cavalry and mercenary foot. My dilemma was that I needed to advance my hoplites to force a stand up battle with Ian’s hoplites, but doing so I would expose my left flank. I could not sit back and wait for Ian to pick me off. I therefore deployed in an echelon formation, hoping that my left flank hoplites, cavalry and psiloi would hold Ian long enough to allow my right-hand hoplites to make contact. In the photo below my Athenians are at the bottom, whilst Ian’s forces are at the top.
004.JPG
Things started well, my psiloi (especially the Cretans) quickly destroyed the opposing psiloi, and surprisingly held against a charge by Ian’s Iberian foot. I was particularly pleased with my handling of the cavalry who out fought the Syracuse cavalry. Ian’s Gallic mercenary units were engaged with my ‘covering’ hoplite units in a bit of a slogging match. Meanwhile my right wing hoplites slowly trudged their way across the table width to engage the stationary Syracuse hoplites. The photo below, shows the situation on my left flank as my hoplites struggle with Ian’s mercenary foot.
005.JPG
On the active left wing both sides continued to lose units, but I had the advantage and forced the Syracuse army to take the 1/3rd morale test first and came within 2 points of victory. I think Ian was worried at this point. Unfortunately my army had run out of steam. I had lost both my ‘Captains’, which severely disrupted my command ability, which combined with the undrilled nature of my hoplites, prevented me from any manoeuvres unless activated with a throw of a 6! I was unable to rally off hits, and there were no more enemy targets which I could easily destroy. In contrast, Ian still had good control of his (weakened) army, and in the last couple of turns was able to manoeuvre and attack the open flanks of my units with impunity. The victory point scores rapidly closed and Ian finally achieved the 50% victory line, while I remained 2 points short!
This was a very close, hard fought battle. The rules continue to impress both Ian and I. The game was still one of manoeuvre and did not really feature a conventional hoplite clash. This was a slight disappointment because I was keen to see if the rules could handle a head-to-head hoplite situation.

Wednesday, 5 November 2014

AAR; Greek Hoplites (Athens) v Thracian (Impetus)


Both armies in this game were supplied by Ian and comprised 500 points using 15mm figures. Unfortunately I forgot my camera and my mobile was out of juice, so I have no photos of the game but have included a photo of my own Greeks instead (Ian’s are far better painted!). Again the rules to be used were Impetus (Lorenzo Sartori; Dadi&Piombo, 2008). My opponent, Ian, commanded the Thracians whilst I took on the Athenians. The two armies would like different terrain set ups; the Thracians would want a cluttered centre and open flanks, whereas the Greeks would prefer an open centre and blocked flanks. I threw to be the defender, so I could place the terrain and secured my right flank with a river, kept the centre open (a couple of gentle hills) and put some rough terrain on the left flank. Ian modified the terrain by moving a wood into my central deployment zone.

I deployed my two hoplite based commands in the centre, with my right flank anchored on the river. My left flank command had my peltasts and 2 cavalry units. Ian deployed his cavalry-heavy command on his left flank, against the river and opposite my hoplites, whilst his 2 peltast commands faced my centre and left flank. Ian’s deployment did surprise me because I expected his cavalry to be positioned on the other, open flank where it could manoeuvre more freely. Both sides had 2 fair generals and 1 expert general.

Greek2.JPG

In the opening moves I rapidly advanced my forces to enable my hoplites to gain the gentle hills to their front. At this point I could have halted and let the Thracians attack me. All the Thracians were javelin armed and remaining stationary would have let them whittle me down, so instead I decided to push forwards and force the issue, thereby retaining the initiative. On my left flank my peltasts were only slightly outnumbered but they did have cavalry support. My cavalry (and general) charged, destroyed some skirmishers and broke a unit of Thracian peltasts, whilst the other peltast units of both sides gradually wore each other down. Ian’s opposing command was close to breaking and his camp was vulnerable to my cavalry breakthrough. Elsewhere on the battlefield, various skirmish units had been lost on both sides, and my hoplites had forced the Thracian cavalry to evade back and was about to engage with the central Thracian peltast command. Some casualties had been taken from incoming javelins and a hoplite unit was destroyed when it managed to engage some Thracian medium cavalry (an ominous sign of things to come!). Time had passed and although one of Ian’s commands was shaky, both armies still seemed to be strong. This game looked to be heading for a solid, timed-out draw. We still had time for one final turn. Ian’s light cavalry moved forward to unleash a hail of javelins again, but this time a hoplite unit broke and others took significant casualties. Ian then launched his medium cavalry who took out another couple of hoplite units. My right hand command suddenly was broken, and due to the few other units lost from the other commands, my whole army dropped below its break point. A shock Thracian win!

This result came right out of the blue! In less than 10 minutes I had moved from a nailed-on honourable draw to defeat: Why? The Thracian victory was down to their cavalry; the combination of javelin armed light cavalry slowly nibbling away at my troops and evading from contact, working with surprisingly strong medium cavalry who packed a heavy punch when launched at the right time. I don’t think my decision to advance beyond the hill line was incorrect, the small advantage the hills offered was not worth the loss of tactical initiative that would have resulted from a static tactic. I was pleased with the attack by my left flank and if it had broken the opposing Thracians a turn or two earlier then I think I could have won the day.

Regarding luck: Ian improved his generals twice (one going to ‘Genius’ level) whereas one of mine dropped a level. Recently Ian seems to be throwing good scores and, for example, in this game he fired with a unit rolling six D6 requiring scores of ‘6’ to hit and he threw five ‘6’s (what are the odds of that?)! My dice rolling continues to be bad and early in the game I had to use two ‘Fate’ bonuses to re-roll bad scores. I have therefore decided to ‘retire’ the yellow set of dice I normally use and replace them with others who have been waiting their chance to shine.
This game was my fourth successive loss! The next match will involve a couple of new rule sets for quick games: Jugular (gladiatorial combat) and DBAv3 (using a range of armies based around 1066).